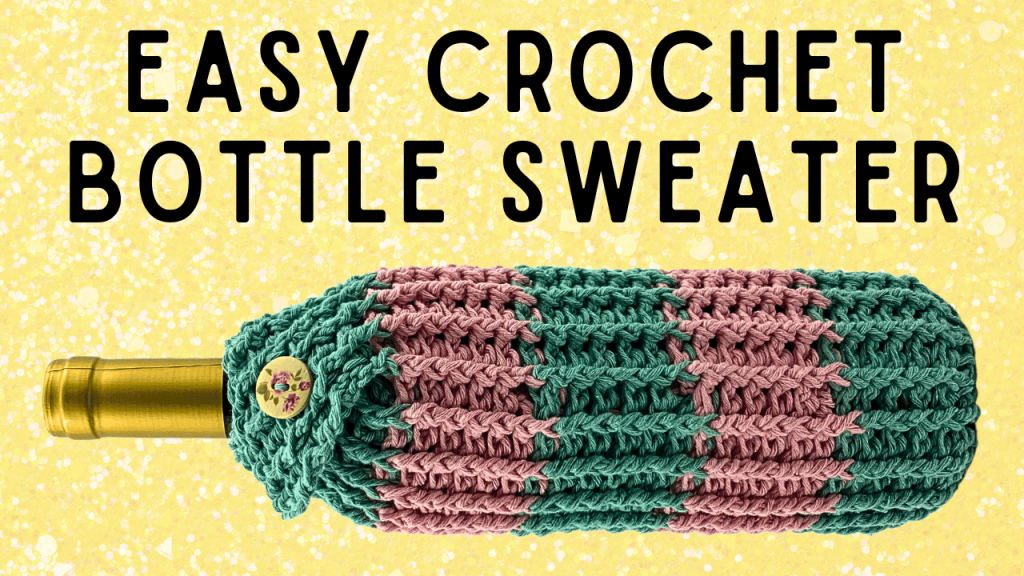
Crochet Wine Bottle Sweater
How to crochet a multi-colored wine bottle sweater? This crochet pattern is perfect to protect wine bottles and other 750 mL bottles. A crochet wine sweater is a great homemade gift, and can be completed in just a few hours.

Crochet Wine Tote Pattern
Crochet hook: H/8/5.0MM
Yarn: Size 4 (Medium Weight), Lion Brand Yarns Re-Up, Recycled Cotton and Polyester Blend Yarn (Rosewater & Surf Spray)
1 button
1 stitch marker or safety pin
Attach yarn to crochet hook using a Magic Circle (MC).
Row 1: CH 2 and place 12 DC inside the MC.
Row 2: Starting with the 1st DC st from Row 1, place 2 DC in each st in the row (this will create a spiral pattern, where we won’t have to worry about starting or stopping our individual rows). Mark the 1st st of this row with the st marker (24 total DC st). The row ends when you make it back around to the st marker.
Row 3: **1 DC in st 1, 2 DC in st 2.** Repeat ** around the row (36 total DC st).
Row 4: Alternate between placing FRONT and BACK POST stitches going around the row, starting with a FRONT POST st and ending with a BACK POST st (36 total st).
Rows 5 – 9: Continue to follow the alternating pattern of FRONT and BACK POST stitches going around the row, following LIKE stitches in a spiral pattern. This should create vertical ridges. At the end of Row 9, after working in the last FRONT POST st, place 1 SL st around the last BACK POST st of the row (please see video if you need help with this step). Remove crochet hook from the current loop and insert the stitch marker.
Row 10: Attach Color B yarn to crochet hook using a slip knot. Working around the last BACK POST st of the row (where you placed the SL st), place 1 BACK POST st. Then continue the alternating FRONT and BACK POST st pattern around the row.
Rows 11 – 15: Continue to follow the alternating pattern of FRONT and BACK POST stitches going around the row, following LIKE stitches in a spiral pattern. At the end of Row 15, after working in the last FRONT POST st, place 1 SL st around the last BACK POST st of the row. Trade your crochet hook and st marker you placed in Row 9 (now your crochet hook should be in the loop you preserved from Row 9, and the st marker should be in the loop that was on your crochet hook at the end of row 15).
Row 16: CH 7 with Color A yarn (this should draw this color up to your current row). Working in the last BACK POST st (where you placed the SL st at the end of Row 15), place 1 BACK POST st. Follow the alternating pattern of FRONT and BACK POST stitches around the row.
Rows 17 – 21: Continue to follow the alternating pattern of FRONT and BACK POST stitches going around the row, following LIKE stitches in a spiral pattern. At the end of Row 21, after working in the last FRONT POST st, place 1 SL st around the last BACK POST st of the row. Trade your crochet hook and st marker you placed in Row 15 (now your crochet hook should be in the loop you preserved from Row 15, and the st marker should be in the loop that was on your crochet hook at the end of row 21).
Row 22: CH 7 with Color B yarn (this should draw this color up to your current row). Working in the last BACK POST st (where you placed the SL st at the end of Row 21), place 1 BACK POST st. Follow the alternating pattern of FRONT and BACK POST stitches around the row.
Rows 23 – 27: Continue to follow the alternating pattern of FRONT and BACK POST stitches going around the row, following LIKE stitches in a spiral pattern. At the end of Row 27, after working in the last FRONT POST st, place 1 SL st around the last BACK POST st of the row. Trade your crochet hook and st marker you placed in Row 21 (now your crochet hook should be in the loop you preserved from Row 21, and the st marker should be in the loop that was on your crochet hook at the end of row 27).
Row 28: CH 7 with Color A yarn (this should draw this color up to your current row). Working in the last BACK POST st (where you placed the SL st at the end of Row 27), place 1 BACK POST st. Follow the alternating pattern of FRONT and BACK POST stitches around the row.
Row 29: CH 2 and turn your work (from here, you should no longer be working in the round, but instead in a rectangle). When you turn your work, the FRONT and BACK POST stitches are now reversed, meaning if you worked a FRONT POST st in the previous row, it now functions as a BACK POST st. The important thing to remember for this pattern is that you want to keep your vertical ridges the same. Following the same alternating pattern, place your BACK and FRONT POST stitches.
Rows 30 – 33: Repeat Row 29.
Cut and tie off yarn, hiding both tails down the inside of the wine sweater.
Insert bottle into sweater and then place your button.
Other Crochet Wine Totes:


Leave a Reply