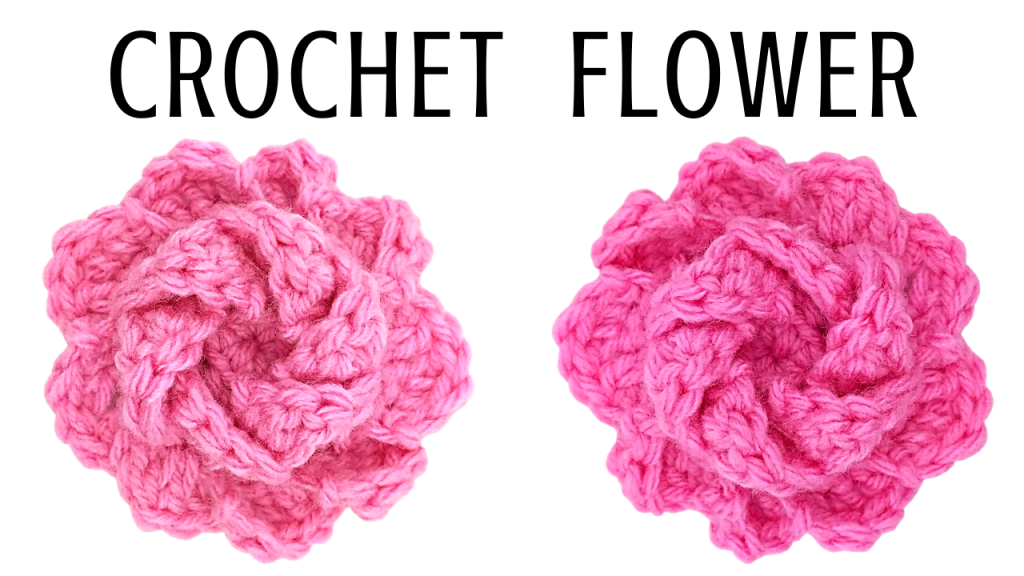
How to Crochet a Flower
This crochet flower tutorial is ideal for crocheting a flower that can easily be attached to any crochet project. I am going to attach this flower to my next wine tote, but I would highly recommend this for any project where you need a quick and easy flower! This flower is adorable and would also be great as a standalone project or to use as Valentine’s day decor!
Crochet Flower Video Tutorial:

30-Minute Flower Pattern (Printable Pattern Below):
Crochet Hook Size: G/6/4.25MM
Yarn: 4 Medium weight
Attach yarn to crochet hook using a Magic Circle (MC).
Row 1: CH 1, place 6 SC inside MC. SL st in 1st SC to join (6 total SC).
Row 2: CH 1, place 2 SC in the BLO of each st in the row – 1st st is current st. Skip SL st and CH 1, then SL st into 1st SC (12 total SC).
Row 3: CH 1, then place *1 SC in st 1, 2 SC in st 2.* First st is the current st. Repeat * around the row. Skip SL st and CH 1, then SL st into 1st SC (18 total SC).
Row 4: CH 1, place *1 SC in st 1 – 2, 2 SC in st 3.* First st is the current st. Repeat * around the row. Skip SL st and CH 1, then SL st into 1st SC (24 total SC).
Row 5: Place 1 SC in each of the FLO stitches created in Row 3 (beginning with the 1st FLO in the row). SL st in 1st SC to join (18 total SC).
Row 6: Place 1 SC in each of the FLO stitches created in Row 2 (beginning with the 1st FLO in the row). SL st in the 1st SC to join (12 total SC).
Row 7: CH 1, place 1 SC in the FLO of current st, then 2 DC in the FLO of the following st. Place 2 DC in the BLO of the next st, then place 1 SC in the BLO of the following st. *Turn the flower around so you can work in the FLO of the last 2 stitches you just worked. Place 1 SL st in each of the front loops, then CH 1 and turn the work. Working in the 1st SL st, place 1 SC, then place 2 DC in the 2nd SL st. Working in the original row, place 2 DC in the BLO of the next st, then place 1 SC in the BLO of the following st.* Repeat * around the row to create 6 petals. The last petal should be worked by placing a SL st in the last two front loops (these will be in the last two stitches of the row). CH 1 and turn the work, then place 1 SC in the 1st SL st and 2 DC in the next SL st. Fold the 1st petal of the row forward and work in the BACK LOOPS created at the beginning of the 1st petal of this row. Place 2 DC in the 1st BACK LOOP and 1 SL st in the 2nd BACK LOOP. SL st into the 1st SC of the next row (this should be the raised SC stitches you created in Row 5.
Row 8: CH 1, place 1 SC in the FLO of current st, then 2 DC in the FLO of the following st. Place 2 DC in the BLO of the next st, then place 1 SC in the BLO of the following st. *Turn the flower around so you can work in the FLO of the last 2 stitches you just worked. Place 1 SL st in each of the front loops, then CH 1 and turn the work. Working in the 1st SL st, place 1 SC, then place 2 DC in the 2nd SL st. Working in the original row, place 2 DC in the BLO of the next st, then place 1 SC in the BLO of the following st.* Repeat * around the row to create 9 petals. The last petal should be worked by placing a SL st in the last two front loops (these will be in the last two stitches of the row). CH 1 and turn the work, then place 1 SC in the 1st SL st and 2 DC in the next SL st. Fold the 1st petal of the row forward and work in the BACK LOOPS created at the beginning of the 1st petal of this row. Place 2 DC in the 1st BACK LOOP and 1 SL st in the 2nd BACK LOOP.
Cut and tie off yarn.
Attach to crochet project.
30-Minute Crochet Flower Pattern
- Crochet Hook Size: G/ 6/4.25MM
- Yarn: 4 Medium weight
-
Attach yarn to crochet hook using a Magic Circle (MC).
-
Row 1: CH 1, place 6 SC inside MC. SL st in 1st SC to join (6 total SC).
-
Row 2: CH 1, place 2 SC in the BLO of each st in the row – 1st st is current st. Skip SL st and CH 1, then SL st into 1st SC (12 total SC).
-
Row 3: CH 1, then place *1 SC in st 1, 2 SC in st 2.* First st is the current st. Repeat * around the row. Skip SL st and CH 1, then SL st into 1st SC (18 total SC).
-
Row 4: CH 1, place *1 SC in st 1 – 2, 2 SC in st 3.* First st is the current st. Repeat * around the row. Skip SL st and CH 1, then SL st into 1st SC (24 total SC).
-
Row 5: Place 1 SC in each of the FLO stitches created in Row 3 (beginning with the 1st FLO in the row). SL st in 1st SC to join (18 total SC).
-
Row 6: Place 1 SC in each of the FLO stitches created in Row 2 (beginning with the 1st FLO in the row). SL st in the 1st SC to join (12 total SC).
-
Row 7: CH 1, place 1 SC in the FLO of current st, then 2 DC in the FLO of the following st. Place 2 DC in the BLO of the next st, then place 1 SC in the BLO of the following st. *Turn the flower around so you can work in the FLO of the last 2 stitches you just worked. Place 1 SL st in each of the front loops, then CH 1 and turn the work. Working in the 1st SL st, place 1 SC, then place 2 DC in the 2nd SL st. Working in the original row, place 2 DC in the BLO of the next st, then place 1 SC in the BLO of the following st.* Repeat * around the row to create 6 petals. The last petal should be worked by placing a SL st in the last two front loops (these will be in the last two stitches of the row). CH 1 and turn the work, then place 1 SC in the 1st SL st and 2 DC in the next SL st. Fold the 1st petal of the row forward and work in the BACK LOOPS created at the beginning of the 1st petal of this row. Place 2 DC in the 1st BACK LOOP and 1 SL st in the 2nd BACK LOOP. SL st into the 1st SC of the next row (this should be the raised SC stitches you created in Row 5
-
Row 8: CH 1, place 1 SC in the FLO of current st, then 2 DC in the FLO of the following st. Place 2 DC in the BLO of the next st, then place 1 SC in the BLO of the following st. *Turn the flower around so you can work in the FLO of the last 2 stitches you just worked. Place 1 SL st in each of the front loops, then CH 1 and turn the work. Working in the 1st SL st, place 1 SC, then place 2 DC in the 2nd SL st. Working in the original row, place 2 DC in the BLO of the next st, then place 1 SC in the BLO of the following st.* Repeat * around the row to create 9 petals. The last petal should be worked by placing a SL st in the last two front loops (these will be in the last two stitches of the row). CH 1 and turn the work, then place 1 SC in the 1st SL st and 2 DC in the next SL st. Fold the 1st petal of the row forward and work in the BACK LOOPS created at the beginning of the 1st petal of this row. Place 2 DC in the 1st BACK LOOP and 1 SL st in the 2nd BACK LOOP.
-
Cut and tie off yarn.
-
Attach to crochet project.
Crochet Wine Koozies:

Crochet Accessories:

Leave a Reply