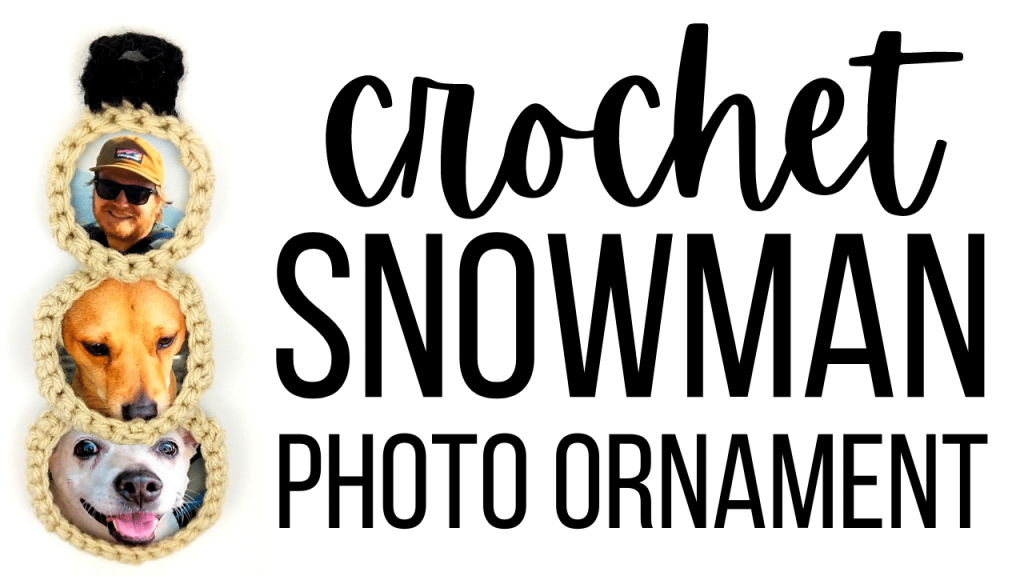
How to Crochet a Snowman Photo Ornament
How to crochet a personalized photo ornament? In this easy crochet tutorial, I show you how to crochet a snowman that doubles as a photo ornament! This crochet pattern is very simple to make and shouldn’t take more than 30 minutes to complete!
Crochet Snowman Photo Ornament Video Tutorial:

Beginner Stitch Tutorials:
Snowman Photo Ornament Pattern:
Crochet Hook: F / 5 / 3.75MM
Yarn: 4 Medium, Big Twist Value brand, Cream and Black
Top Portion:
Attach CREAM yarn to crochet hook using a Magic Circle (MC).
Row 1: CH 1, place 6 SC inside MC. SL st into 1st SC to join (6 total SC st).
Row 2: CH 1, place 2 SC in each st in the row – including current st. SL st into 1st SC to join (12 total SC st).
Row 3: CH 1, place *1 SC in st 1, 2 SC in st 2, 1st st should be placed in current st. SL st into 1st SC to join (18 total SC st).
Row 4: CH 1, place *1 SC in st 1 – 2, 2 SC in st 3, 1st st should be placed in current st. SL st into 1st SC to join – yarning over with black yarn, but don’t cut off cream yarn (24 total SC st).
Row 5 (Part 1): CH 1 (with black yarn), place 1 SC in the BLO of 1st 4 st – including current st. CH 1, turn work, place 1 SC in each of the 4 st. CH 1, turn, place 1 SC in st 1, CH 2, place 1 SC in st 4. Cut and tie off yarn.
Row 5 (Part 2): Pull cream yarn through the last SC st before the SL st where you changed colors. CH 1, place 1 SC in current st and place 1 SC in the next 2 st FLO created in Row 5 Part 1. Skip the next FLO and place 1 SC in the following FLO. Place 1 SC in the next 2 full st. *Skip the next st and place 1 SC in the following 3 st.* Repeat * until you get to the end of the row – marked by the CH 1. Row should end with a spare st, skip that st, the SL st, and the CH 1 st, and place 1 SL st in the 1st SC st of Part 2 to join (!8 total SC st in Part 1).
Cut and tie off yarn.
Middle Portion:
Attach CREAM yarn to crochet hook using a Magic Circle (MC).
Row 1: CH 1, place 6 SC inside MC. SL st into 1st SC to join (6 total SC st).
Row 2: CH 1, place 2 SC in each st in the row – including current st. SL st into 1st SC to join (12 total SC st).
Row 3: CH 1, place *1 SC in st 1, 2 SC in st 2, 1st st should be placed in current st. SL st into 1st SC to join (18 total SC st).
Row 4: CH 1, place *1 SC in st 1 – 2, 2 SC in st 3, 1st st should be placed in current st. SL st into 1st SC to join – yarning over with black yarn, but don’t cut off cream yarn (24 total SC st).
Row 5: CH 1, place *1 SC in st 1 – 3, 2 SC in st 4, 1st st should be placed in current st. SL st into 1st SC to join – yarning over with black yarn, but don’t cut off cream yarn (30 total SC st).
Row 6: CH 1, place *1 SC in st 1 – 4, skip st 5.* 1st st should be placed in current st. Repeat * around the row. SL st into 1st SC st to join (24 total SC st).
Cut and tie off yarn.
Bottom Portion:
Attach CREAM yarn to crochet hook using a Magic Circle (MC).
Row 1: CH 1, place 6 SC inside MC. SL st into 1st SC to join (6 total SC st).
Row 2: CH 1, place 2 SC in each st in the row – including current st. SL st into 1st SC to join (12 total SC st).
Row 3: CH 1, place *1 SC in st 1, 2 SC in st 2, 1st st should be placed in current st. SL st into 1st SC to join (18 total SC st).
Row 4: CH 1, place *1 SC in st 1 – 2, 2 SC in st 3, 1st st should be placed in current st. SL st into 1st SC to join – yarning over with black yarn, but don’t cut off cream yarn (24 total SC st).
Row 5: CH 1, place *1 SC in st 1 – 3, 2 SC in st 4, 1st st should be placed in current st. SL st into 1st SC to join – yarning over with black yarn, but don’t cut off cream yarn (30 total SC st).
Row 6: CH 1, place *1 SC in st 1 – 4, 2 SC in st 5, 1st st should be placed in current st. SL st into 1st SC to join – yarning over with black yarn, but don’t cut off cream yarn (36 total SC st).
Row 6: CH 1, place *1 SC in st 1 – 5, skip st 6.* 1st st should be placed in current st. Repeat * around the row. SL st into 1st SC st to join (30 total SC st).
Cut and tie off yarn.
Assembly:
Join the three pieces however you would like. I moved my starting tails to the bottom and used them to attach to the piece below.
Other Crochet Christmas Items!


Leave a Reply