How to Crochet a Basket – Under $2!
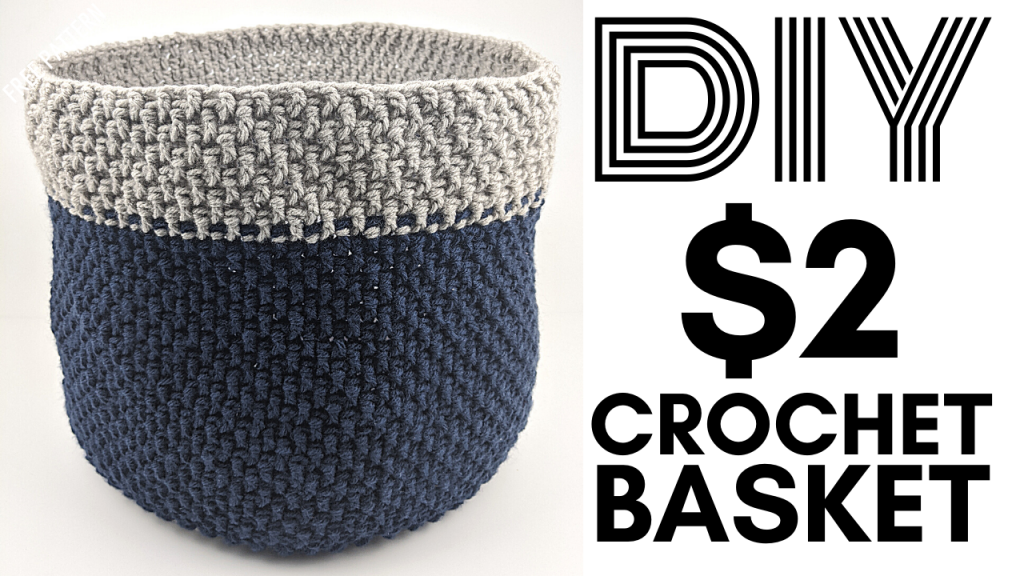
How to crochet a basket? In this tutorial, I show you how to crochet a basket that is flexible and would be perfect on a bookshelf, desk, or floor to hold items. This basket cost me roughly $1.50 in materials! I personally made this for my husband’s desk as he needed a place to put some items.
How to Crochet a Basket Video Tutorial:

This pattern is customizable to your size needs and is very basic only using a few stitches. If you are new to crochet or need stitch refreshers,
Check out my stitch tutorials here:
Terms Used in Pattern:
MC – Magic Circle
DC – Double Crochet
SC – Single Crochet
SL – Slip Stitch
st – Stitch
How to crochet a basket pattern:
Crochet Hook: F / 5 / 3.75 MM
Yarn: 4 Medium, Big Twist brand
Magic Circle (MC) – Continuous circle pattern – Color A
Row 1: 12 DC inside MC (12 total st at end of row).
Row 2: Starting with 1st DC from Row 1, place 2 DC in each st (24 total st at end of row).
Row 3: *1 DC in st 1, 2 DC in st 2.* Repeat * around row (36 total st at end of row).
Row 4: *1 DC in st 1 – 2, 2 DC in st 3.* Repeat * around row (48 total st at end of row).
Row 5: *1 DC in st 1 – 3, 2 DC in st 4.* Repeat * around row (60 total st at end of row).
Row 6: *1 DC in st 1 – 4, 2 DC in st 5.* Repeat * around row (72 total st at end of row).
Row 7: *1 DC in st 1 – 5, 2 DC in st 6.* Repeat * around row (84 total st at end of row).
Row 8: *1 DC in st 1 – 6, 2 DC in st 7.* Repeat * around row (96 total st at end of row).
Row 9: *1 DC in st 1 – 7, 2 DC in st 8.* Repeat * around row (108 total st at end of row).
Row 10: *1 DC in st 1 – 8, 2 DC in st 9.* Repeat * around row (120 total st at end of row).
Row 11: *1 DC in st 1 – 9, 2 DC in st 10.* Repeat * around row, but stop after your 11th increase (in the video I completed all 12 increases and then backed out of my last one to keep it simple). After your 11th increase, place 1 SC in the next 5 st, then 1 SL in the next 3 st. In the next st, place 1 SL, but yarn over with Color B (131 total st at end of row).
Row 12: CH 2 and place 1 DC in each st in your row (131 total st at end of row).
Row 13: Using a continuous loop pattern, place a front post st around CH 2 from the previous row. In the next st, place 1 back post st. Continue alternating between 1 front post st and 1 back post st for the entire row. The end of the row should end on a front post st (131 total st at end of row).
Row 14: Place 1 back post st around the front post st from the previous row. Alternate between front and back post stitches for the rest of the row, and note that these should be the opposite of the previous row (meaning you should place front post stitches around the previous row’s back post stitches and vice versa).
Rows 15 – ?: Continue this continuous loop alternating pattern until the basket reaches your desired height.
Once Color B has reached your desired height, place 1 SC around the next 6 st posts (keeping up with your alternating pattern), then place 1 SL around the following 6 st posts (keeping up with your alternating pattern). Place a SL in the top of the next st, and yarn over with Color A.
Row 1 of Color A: CH 2 and then continue with your alternating pattern of 1 front post and 1 back post st. Make sure that you do the opposite of the previous row’s posts. When you come across the previous rows SC and SL st, try to crochet around their “posts” as well, avoiding the top of the st).
Row 2: Place a front post st around your CH 2 and continue your alternating pattern using a continuous loop pattern.
Rows 3 – ?: Alternate between front and back post stitches, making sure you are working the opposite of the previous row and follow a continuous loop pattern until the basket reaches your desired height.
Once the basket reaches your desired height, place 1 SC around the next 6 post st, then 1 SL around the following 6 post st. SL in the top of the next st, tie off your yarn, and secure all tails and hide them.
Other crocheted household items (with other baskets):


Leave a Reply