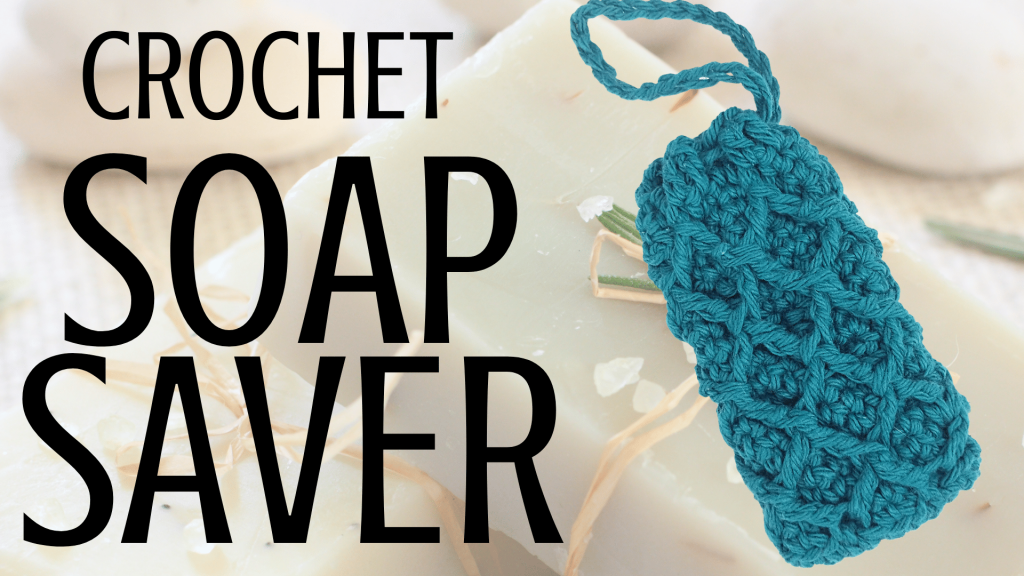
Crochet Elegant Cotton Soap Saver
How to crochet a soap saver? In this tutorial, I show you how to crochet a very cute soap saver with ridges for exfoliation. This cotton soap saver has a tail-free easy to pull cinch that doubles as a hanging loop for ease in the shower. This is a very quick crochet project that shouldn’t take you longer than 30 minutes to complete. This project is ideal for campers, zero-wasters, or anyone who uses bar soap.
Crochet Soap Saver Video Tutorial:

This soap saver is part of a two skein challenge, where I see how many crochet projects I can make with two crochet hooks and two skeins of yarn!
Follow along with my skein challenge:
Crochet extra-large produce bag: https://youtu.be/NsBELxhISlI
Crochet large produce bag: https://youtu.be/XHlDRhT0O7U
Crochet medium produce bag: https://youtu.be/o7S1-CKGgfY
Crochet silverware case: https://youtu.be/1CsxaQOKzkQ
Crochet face scrubber: https://youtu.be/XKj81ZIV8Ak
Crochet button: https://youtu.be/QoP68NL6CDI
Crochet macrame ring: https://youtu.be/7SH5XWfFKwM
Stitches used in this pattern:
Attach Yarn to Crochet Hook: https://youtu.be/IsOvsrvJhN8
Chain (CH): https://youtu.be/jLP-o-RnqqQ
Single Crochet (SC): https://youtu.be/xppth_5GBzM
Slip Stitch (SL st): https://youtu.be/cMNam0kuhpQ
Triple Crochet (TR): shown in video
How to Crochet an Elegant Soap Saver:
Crochet Hook: G / 6 / 4.25
Yarn: 4 Cotton, Worsted Weight, Lily Sugar N’ Cream, Teal
Attach yarn to crochet hook using slip knot.
Row 1: CH 11, turn.
Row 2: 1 SC in BLO of each st in the row – beginning with 2nd CH from crochet hook. Turn so that you can access the FLO and place 1 SC in each FLO (10/side, 20 SC in total – you should have an oval now). SL st into top of 1st SC st from this row.
Row 3: CH 1, place 1 SC in BLO of each st in the row – including 1st st where you placed your SL st. SL st into top of 1st SC st from this row (20 total SC).
Row 4: CH 1, place 1 SC in each st in the row – including 1st st where you placed your SL st. SL st into top of 1st SC st from this row (20 total SC).
Row 5: Working in the FLO from Row 2, place 1 TR in the 2nd front loop from the current front loop (this is located directly below the st where you placed the SL st). In the top row, place 1 SC in the next 3 st. *Yarn over 2x, insert crochet hook back in same front loop you just worked, yarn over, pull up through the loop, then yarn over and drop 2 loops at a time until 2 loops remain on crochet hook. Yarn over, then insert crochet hook in 4th front loop from current (skipping 3), Yarn over and pull up through the loop, yarn over and drop 2 loops, then yarn over and drop 3 loops. Working back in the top portion of the row, place 1 SC in the 3 st directly above – framing – the last front loop that you worked.* Repeat * around the row. For the last st, Yarn over 2x, insert crochet hook back in same front loop you just worked, yarn over, pull up through the loop, then yarn over and drop 2 loops at a time until 2 loops remain on crochet hook. Yarn over, then insert the crochet hook under the stem that the 1st TR of this row formed. Yarn over and pull through all loops on your crochet hook for a SL st. SL st into the top of the 1st TR from this row.
Rows 6 – 7: CH 1, place 1 SC in each st in the row – including 1st st where you placed your SL st. SL st into top of 1st SC st from this row (20 total SC).
Row 8: Yarn over 2x, insert crochet hook under the 2 stems that form the peak directly below crochet hook. Yarn over and pull up through the stems, then yarn over and drop 2 loops at a time until 2 loops remain on the crochet hook. Yarn over and insert the crochet hook under the 2 stems that form the next peak. Yarn over and pull up through the stems, yarn over and drop 2 loops, then yarn over and drop 3 loops. Working in the top row, place 1 SC in each of the 3 st directly above the last peak that you worked. * Yarn over 2x, insert crochet hook under the 2 stems that form the last peak you worked, yarn over and pull up through the stems, then yarn over and drop 2 loops at a time until 2 loops remain on crochet hook. Yarn over and insert the crochet hook under the 2 stems that form the next peak. Yarn over and pull up through the stems, yarn over and drop 2 loops, then yarn over and drop 3 loops. Working in the top row, place 1 SC in each of the 3 st directly above the last peak that you worked. * Repeat * around the row. Work the last peak by working the same pattern in the last and first peak of this row. Place 1 SC in the last 3 st of this row. SL st into the next st.
Rows 9 – 10: CH 1, place 1 SC in each st in the row – including 1st st where you placed your SL st. SL st into top of 1st SC st from this row (20 total SC).
Rows 11 – 20: Repeat the last 3 rows until you have 6 intersections working in your peaks.
Row 21: CH 2, place 1 DC in each st in the row – including 1st st where you placed your SL st. SL st into top of 1st DC st (20 total DC).
CH 30, then remove crochet hook from loop (keep it large enough that you can reinsert it later) and cut the strand of yarn, leaving a few extra inches to work with later. Weave the CH st between the last row of DC st – about every 2 st. When you get back to the start of your chain, SL st back into the same st that you did at the end of the last row. Tie off yarn.
Pull the cinch somewhere else in your pattern to close the soap saver, and hang your soap sack in the shower or outside.
Leave a Reply