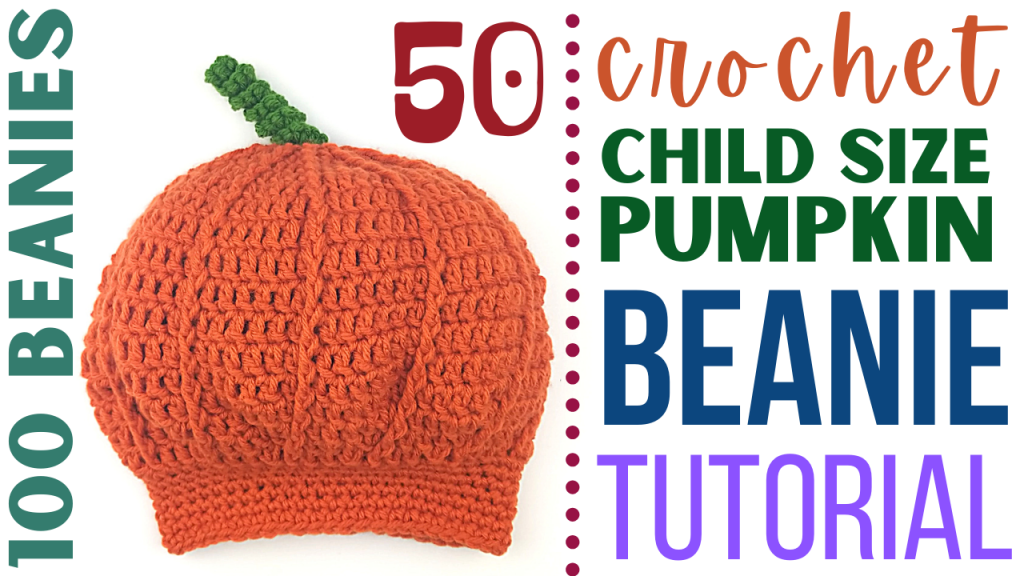
DIY Crochet Beanie – Day 50 – Crochet Child Sized Pumpkin Beanie
How to crochet a beanie? In this tutorial, I show you how to crochet a pumpkin beanie! This beanie would make an excellent addition to a Halloween costume, zoom meeting on Halloween day, or just to generally celebrate fall! This beanie would look great as a DIY Halloween costume with some Jack-O-Lantern face paint and an orange scarf (weather permitting).
Adult Size Pumpkin Beanie Tutorial: https://youtu.be/i6d2ZWgcmm8
Pom Pom (Pompon) Maker: https://youtu.be/6ISz8AcMusk
Crochet Beanie Video Tutorial:

This beanie is part of a series of beanies that I am creating to donate to my local homeless shelter. The goal is to complete 100 beanies in 100 days, all using unique patterns that I am going to share with you each day.
Stitches used in this pattern (and their corresponding tutorials):
Magic Circle (MC): https://youtu.be/pTcHUJ8PDMQ
Double Crochet (DC): https://youtu.be/bA7b2sOIfzM
Single Crochet (SC): https://youtu.be/xppth_5GBzM
Slip stitch (SL st): https://youtu.be/cMNam0kuhpQ
Crochet Child Size Halloween Pumpkin Beanie Pattern:
Crochet Hook: F / 5 / 3.75MM
Yarn: 4 Medium ~ Big Twist Value brand, Burnt Orange
Magic Circle
Row 1: 12 DC inside MC.
Row 2: 1 DC + 1 FRONT POST st in every st in the row (following continuous loop pattern, where we won’t be starting and stopping each row, but instead it will act as more of a spiral).
Row 3: *1 DC in st 1, 1 DC + 1 FRONT POST st in st 2.* Repeat * around the row (24 total st at end of row).
Row 4: *1 DC in st 1 – 2, 1 DC + 1 FRONT POST st in st 3.* Repeat * around the row (36 total st at end of row).
Row 5: *1 DC in st 1 – 3, 1 DC + 1 FRONT POST st in st 4.* Repeat * around the row (48 total st at end of row).
Row 6: *1 DC in st 1 – 4, 1 DC + 1 FRONT POST st in st 5.* Repeat * around the row (60 total st at end of row).
Row 7: *1 DC in st 1 – 5, 1 DC + 1 FRONT POST st in st 6.* Repeat * around the row (72 total st at end of row).
Row 8: *1 DC in st 1 – 6, 1 DC + 1 FRONT POST st in st 7.* Repeat * around the row (84 total st at end of row).
Rows 9 – 15: Follow like stitches, placing 1 DC in each of the previous row’s DC stitches, and 1 FRONT POST st in each of the previous row’s FRONT POST stitches. Ensure that you are not adding a DC st to your FRONT POST st, as this will cause the beanie to continue to increase.
Row 16: *1 DC in st 1 – 4, DC 2together in st 5 & 6, 1 FRONT POST st in st 7.* Repeat * around the row (72 total st at end of row).
Row 17: *1 DC in st 1 – 3, DC 2together in st 4 & 5, 1 FRONT POST st in st 6.* Repeat * around the row (60 total st at end of row).
Row 18: *1 DC in st 1 – 2, DC 2together in st 3 & 4, 1 FRONT POST st in st 5.* Repeat * around the row (48 total st at end of row).
Rows 19 – 25: Place 1 SC in each st in the row.
Attach a corkscrew vine (tutorial in video).
Attach a pom pom: https://youtu.be/6ISz8AcMusk
Other beanie tutorials in my 100 day series:
![]()
![]()
![]()
![]()
![]()
![]()
![]()
![]()
![]()
![]()
![]()
![]()
![]()
![]()
![]()
![]()
![]()

Leave a Reply