
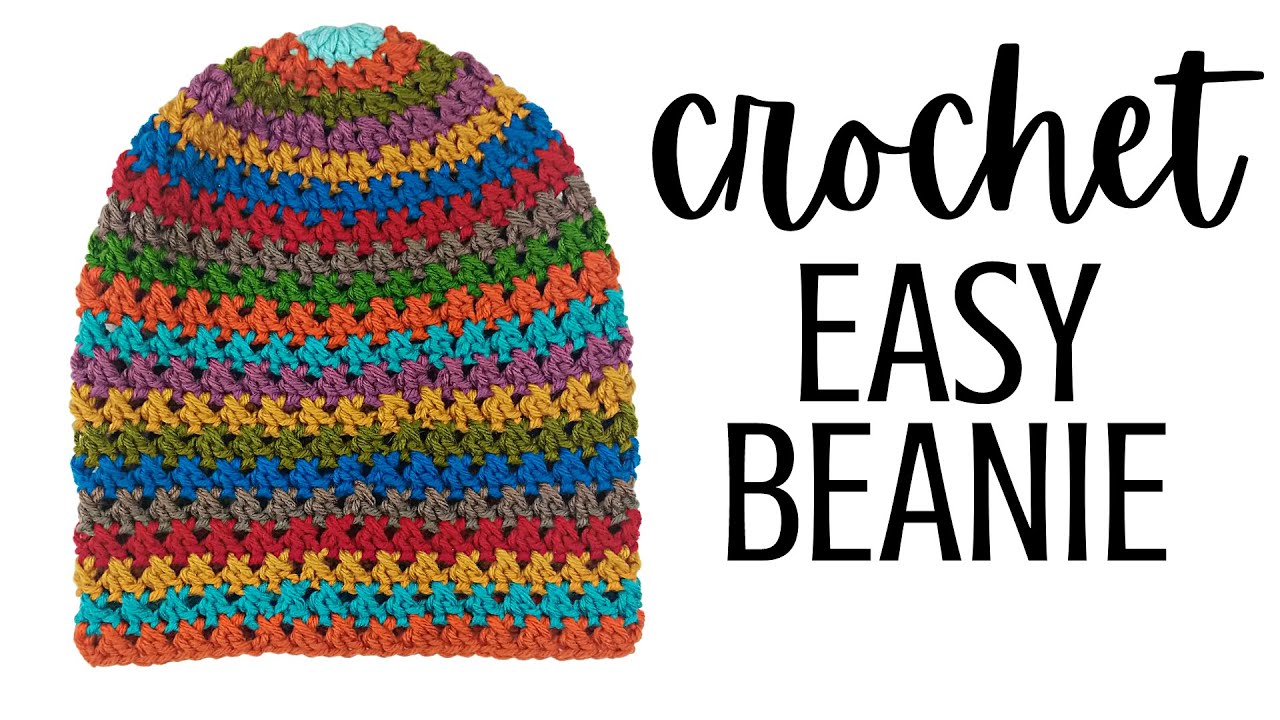
How to Crochet a Beanie – Day 67
How to crochet a beanie? In this tutorial, I show you how to crochet a beanie that is very simple and shouldn’t take you more than 1 hour to complete. The colors used in this pattern can easily be exchanged to fit whatever color scheme you like.
Crochet Beanie Video Tutorial:
Stitches used in this pattern (and their corresponding tutorials):
Magic Circle (MC): https://youtu.be/pTcHUJ8PDMQ
Double Crochet (DC): https://youtu.be/bA7b2sOIfzM
Chain (CH): https://youtu.be/jLP-o-RnqqQ
Slip stitch (SL st): https://youtu.be/cMNam0kuhpQ
Crochet Beanie Pattern FREE:
Crochet Hook: F / 5 / 3.75MM
Yarn: 4 Medium ~ Big Twist Value brand
Magic Circle
Row 1: 13 DC inside MC. On last DC st, switch colors in the middle of the st (yarn over with next color on last yarn over of the st). SL st into top of 2nd DC st.
Row 2: CH 3, then place 1 DC in st directly behind CH 3 (working backwards). That creates your 1st criss-cross st. Place 1 DC in next st then place 1 DC in st behind the current DC (this will be the SL st from Row 1 and the same st where your CH 3 is). This is how to create an increasing criss-cross st. Continue placing increasing criss-cross stitches by placing 1 DC in the next st, then placing 1 DC in st behind the current st (this is where you placed the 1st DC of your last criss-cross st). On last DC of last criss-cross st, change colors like you did at the end of Row 1. At the end of the row, you should have 12 criss-cross stitches. SL st in the top of the CH 3 st to join.
Row 3: CH 3, then place 1 DC in st directly behind CH 3. Then place 2 increasing criss-cross stitches and then 1 regular criss cross st. To create a regular criss-cross st, skip next st (this isn’t a st that you have already worked in), and place 1 DC in the next st, then place 1 DC in the skipped st. Follow the pattern of placing 2 increasing criss-cross stitches and then 1 regular criss-cross st all the way around your row. On last DC of last criss-cross st, change colors (you should have 18 criss-cross st at the end of the row). SL st in the top of the CH 3 st to join.
Row 4: CH 3, then place 1 DC in st directly behind CH 3 st. Then alternate between placing 1 increasing criss-cross st and 1 regular criss-cross st. On last DC of last criss-cross st, change colors. At the end of the row, you should have 24 criss-cross stitches. SL st in the top of CH 3 st to join.
Row 5: CH 3, then place 1 DC in st directly behind CH 3 st. Then, place 3 regular criss-cross stitches followed by 2 increasing criss-cross stitches. Follow that pattern around the row, and on last DC of last criss-cross st, change colors. You should have 30 criss-cross st at the end of the row. SL in the top of CH 3 st.
Rows 6 – 20: CH 3, then place 1 DC in st directly behind CH 3 st. Then place regular criss-cross st around the row. On the last DC of the last criss-cross st, change colors. At the end of each row, you should have 30 criss-cross stitches. SL st in the top of CH 3.
Cut and tie off yarn.
Leave a Reply