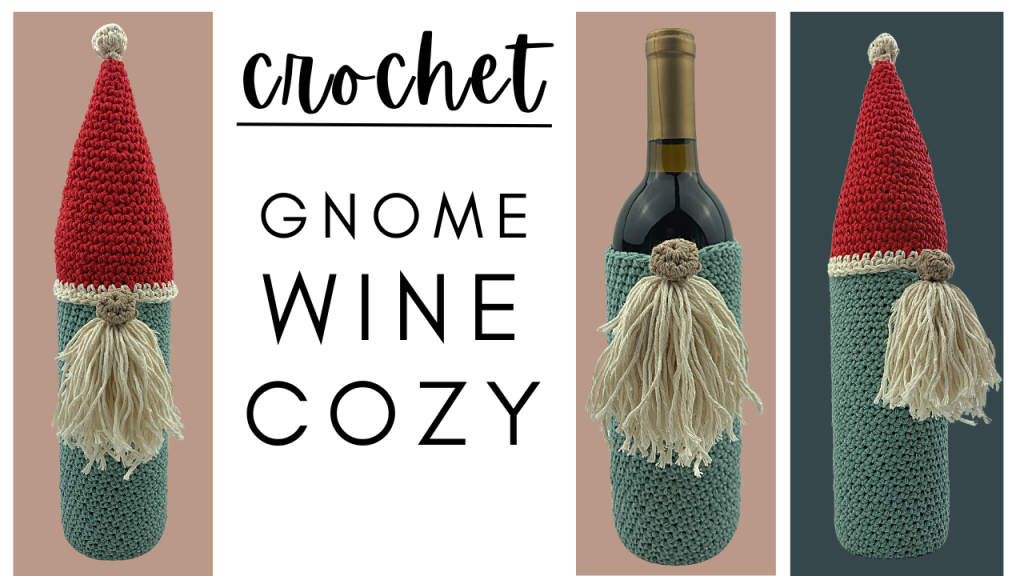
Crochet Christmas GNOME Wine Cozy
NEW Crochet Tutorial → Crochet CHRISTMAS GNOME Wine Cozy! This quick and easy crochet pattern is perfect for holiday gift giving or decorating around your house.
Crochet Christmas Gnome Wine Cozy

Crochet Christmas Gnome Wine Cozy Pattern
Crochet Hook: G/6/4.25MM
Yarn: Size 4, Medium Weight (I am working with the Lion Brand Yarn’s Re-Up (100% Recycled Cotton & Polyester Blend Yarn) and the Lily Sugar N’Cream Cotton Yarn.
Wine Cozy:
**Use a st marker or scrap piece of yarn to mark the 1st st in each row**
Attach yarn to crochet hook using a Magic Circle (MC).
Row 1: CH 1 and place 8 SC inside the MC.
Row 2: Skip CH 1 and starting in 1st SC st, place 2 SC in each st in the row (make sure you mark the first of these stitches, as this is a spiral pattern) (16 total SC st).
Row 3: Place **1 SC in st 1, 2 SC in st 2.** Repeat ** around the row (24 total SC st).
Row 4: Place **1 SC in st 1 – 2, and 2 SC in st 3.** Repeat ** around the row (32 total SC st).
Row 5: Place 1 SC in the BACK LOOP ONLY (BLO) of each st in the row.
Rows 6 – 44: Place 1 SC in each st in the row.
Place 1 SL st in the next st, then cut yarn, insert crochet hook in the following st, and yarn over and pull yarn all the way through to tie it off. Do not hide the tail as we will use it to attach the nose and beard.
Hat:
**Use a st marker or scrap piece of yarn to mark the 1st st in each row**
Attach yarn to crochet hook using a Magic Circle (MC).
Row 1: CH 1 and place 5 SC inside the MC.
Row 2: Skip CH 1 and place 2 SC in st 1, from here we want to place 1 SC in each st in the row EXCEPT 1 other st where we want to place 2 SC. I try to space out the two increasing stitches (7 total SC st).
Row 3: Place 1 SC in each st in the row EXCEPT 1 st where you will place 2 st. Try to make sure that you are randomizing where you place this increasing st. You don’t want to place an increasing st in the same st as the previous row, as this will make the hat start to tilt (8 total SC).
Row 4: Place 1 SC in each st in the row EXCEPT 2 st where you will place 2 st (10 SC st).
Row 5: Place 1 SC in each st in the row EXCEPT 1 st where you will place 2 st (11 SC st).
Row 6: Place 1 SC in each st in the row EXCEPT 2 st where you will place 2 st (13 SC st).
Row 7: Place 1 SC in each st in the row EXCEPT 1 st where you will place 2 st (14 SC st).
Row 7: Place 1 SC in each st in the row EXCEPT 2 st where you will place 2 st (16 SC st).
Row 8: Place 1 SC in each st in the row EXCEPT 1 st where you will place 2 st (17 SC st).
Row 9: Place 1 SC in each st in the row EXCEPT 2 st where you will place 2 st (19 SC st).
Row 10: Place 1 SC in each st in the row EXCEPT 1 st where you will place 2 st (20 SC st).
Row 11: Place 1 SC in each st in the row EXCEPT 2 st where you will place 2 st (22 SC st).
Row 12: Place 1 SC in each st in the row EXCEPT 1 st where you will place 2 st (23 SC st).
Row 13: Place 1 SC in each st in the row EXCEPT 2 st where you will place 2 st (25 SC st).
Row 14: Place 1 SC in each st in the row EXCEPT 1 st where you will place 2 st (26 SC st).
Row 15: Place 1 SC in each st in the row EXCEPT 2 st where you will place 2 st (28 SC st).
Row 16: Place 1 SC in each st in the row EXCEPT 1 st where you will place 2 st (29 SC st).
Row 17: Place 1 SC in each st in the row EXCEPT 2 st where you will place 2 st (31 SC st).
Row 18: Place 1 SC in each st in the row EXCEPT 1 st where you will place 2 st (32 SC st).
Row 19: Place 1 SC in each st in the row EXCEPT 2 st where you will place 2 st (34 SC st).
Rows 20 – 23: Place 1 SC in each st in the row.
Cut yarn, insert crochet hook in the next st, yarn over and pull all the way through to tie off yarn.
Row 24: Attach brim color to crochet hook using a slip knot and insert the crochet hook in the same st where you just inserted your crochet hook to tie off your yarn. Place 1 SC here and in each st in the row. Place 1 SL st in the 1st SC to join at the end of the row.
Row 25: CH 1, working back in the same st where you placed the SL st, place 1 SC, then place 1 SC in each st in the row. Skip the SL st and CH 1 at the end of the row, and place 1 SL st in the 1st SC to join.
Cut and tie off yarn.
Nose & Pompon:
**Use a st marker or scrap piece of yarn to mark the 1st st in each row**
Attach yarn to crochet hook using a Magic Circle (MC).
Row 1: CH 1 and place 8 SC inside the MC.
Row 2: Skip CH 1 and starting in 1st SC st, place 2 SC in each st in the row (make sure you mark the first of these stitches, as this is a spiral pattern) (16 total SC st).
Row 3: SC 2 together going around the row (8 total SC st).
Cut a tail of 8 inches, insert crochet hook in the next st, yarn over and pull all the way through to tie off yarn.
Stuff tiny ball with the starting tail and a long strand of same color yarn, then weave the tail in and out of the last row of SC st.
Pull the tail tightly to cinch up the hole and then tie off the cinch using loops from the last row of SC st.
Use the ending tail to attach the pompon to the top of the hat.
Use the ending tail of the nose to attach the beard.
Beard:
Using a pair of scissors, tie a knot around one of the scissor loops and then cut the yarn to the length of the scissors. Hold the other end of this strand of yarn against the blades of the scissors and then start to wrap yarn around the scissors and the strand of yarn. Make sure you work over the hand holds for the scissors to give the beard a long, textured look.
Once you have gotten the beard to your desired thickness, untie the little knot in the finger hold and use the ends of the strand of yarn to slide the scissors pompon off of the scissors (pull the scissors out).
Tie the yarn strand ends together as tightly as you can several times.
Holding the ends of your yarn strand, cut all of the loops to create the beard.
Attaching Nose and Beard:
Slide the tail of the nose through the loop that goes tightly around your beard, the nose facing out from whatever side you want facing outwards.
Pull the nose tail through the top of the wine cozy, next to where your ending tail for the wine cozy is, and in the st beside this, pull the wine cozy tail through (both tails should be next to each other, through the wine cozy, and on the inside of the wine cozy). Tie the two tails together a few times and hide them on the inside of the wine cozy.
Insert a wine bottle into the cozy and then sit the hat on top for the completed look.
Other Crochet Christmas Tutorials →


Leave a Reply