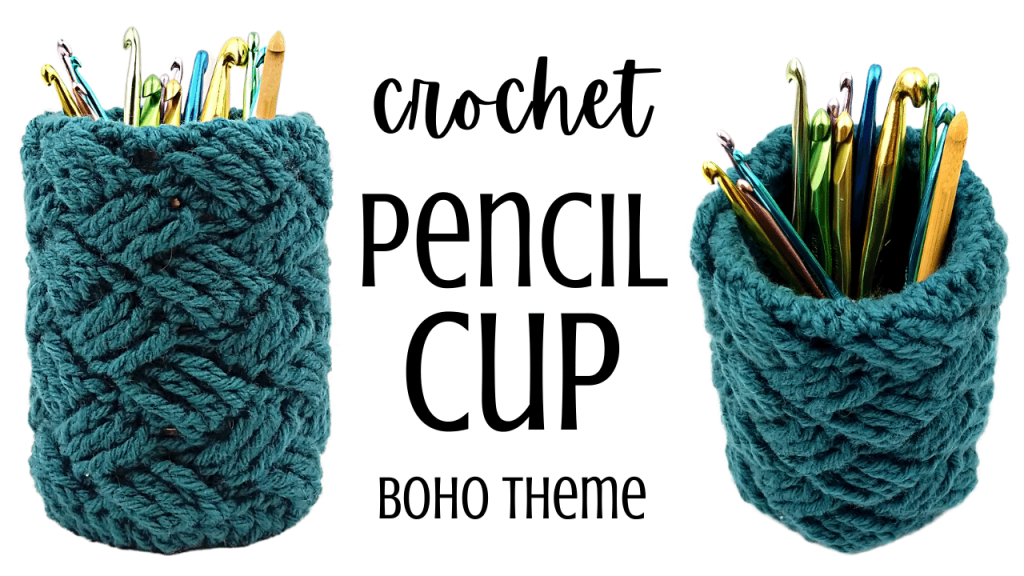
Crochet Pencil Cup for Deck Storage
How to crochet a pen cup? This DIY pencil cup is extremely cute, and is a perfect addition to any desk! This project is very cost-effective, using only a small amount of yarn and reusing a steel can!
Crochet Pencil Cup Video Tutorial:

ONE SKEIN CHALLENGE #2 – Cozy up at Home Theme!
Crochet Swirly Beanie

Crochet Pencil Cup
Sturdy Pencil Cup FREE Crochet Pattern!
Materials:
Crochet Hook: H/8/5.00MM
Yarn: 4 Medium, Big Twist Value brand, Color: Dark Teal
1 steel can – 15 oz.
Attach yarn to crochet hook using a Magic Circle (MC).
Row 1: CH 2 and place 12 DC inside MC. SL st in 1st DC to join (12 total DC st).
Row 2: CH 2 and place 2 DC in each st in the row – 1st st is current st, and avoid working in the SL st at the end of the row. SL st in 1st DC to join (24 total DC st).
Row 3: CH 2 and place *1 DC in st 1, 2 DC in st 2.* The 1st st of the row should be placed in the current st. Repeat * around the row, skipping the SL st at the end of the row. SL st into the 1st DC to join. (36 total DC st).
Row 4: Skip the first 3 st of this row – 1st st is current st where you placed the SL st. Place 1 TR in the following 3 st (st 4 – 6). Working backwards in the 3 skipped stitches (starting with the 1st skipped st), place 1 TR in each skipped st, but make sure you are working the stitches IN FRONT of the 3 TR stitches you just placed. *Skip the next 3 st, place 1 TR in the following 3 st, then work in front of the TR stitches you just placed, place 1 TR in the 3 skipped stitches, starting with the 1st skipped st.* Repeat * around the row (36 total TR stitches).
Row 5: Place 1 SL st in the next 3 st, then skip the following 3 st, place 1 TR in the following 3 st, and working backwards in the skipped stitches – this time working BEHIND the TR stitches you just placed, place 1 TR in each of the skipped stitches, starting with the 1st skipped st. *Skip the next 3 st, place 1 TR in the following 3 st, then work BEHIND the TR stitches you just placed, place 1 TR in the 3 skipped stitches, starting with the 1st skipped st.* Repeat * around the row (36 total TR stitches).
Row 6: Place 1 SL st in the next 3 st, then skip the following 3 st, place 1 TR in the following 3 st, and working backwards in the skipped stitches – this time working IN FRONT OF the TR stitches you just placed, place 1 TR in each of the skipped stitches, starting with the 1st skipped st. *Skip the next 3 st, place 1 TR in the following 3 st, then work IN FRONT OF the TR stitches you just placed, place 1 TR in the 3 skipped stitches, starting with the 1st skipped st.* Repeat * around the row (36 total TR stitches).
Rows 7 – 10: Repeat Rows 5 & 6.
Rows 11 – 18: Place 1 SC in each st in each row, allowing the pattern to form a spiral. To finish of the pencil cup, place 1 SL st in the last 5 stitches of the last row.
Cut and tie off yarn.
Insert sleeve around steel can, pushing the SC rows down inside the can.
Other Crochet Household Items Tutorials!


Leave a Reply