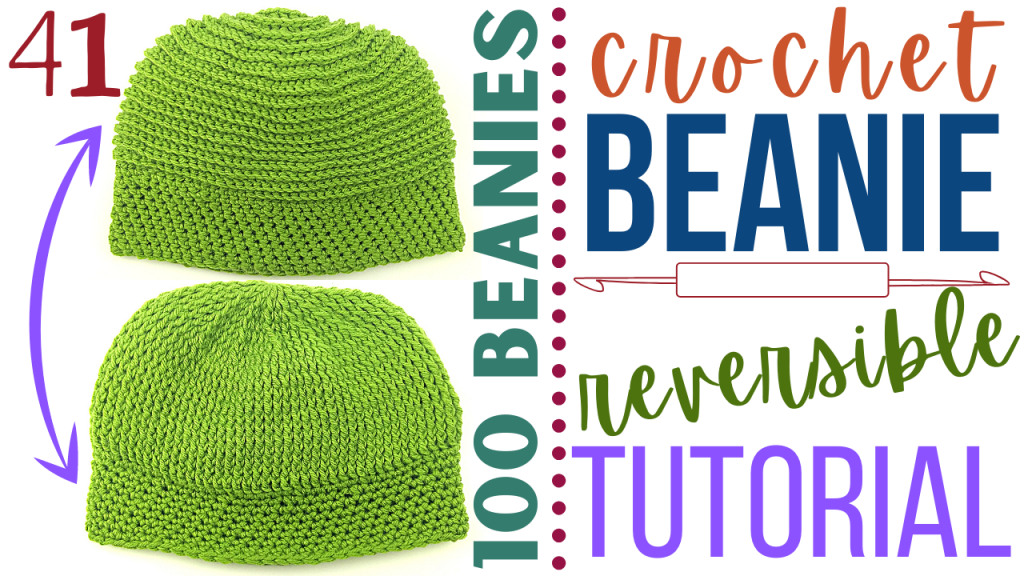
DIY Crochet Beanie – Day 41 – Crochet Male Beanie – Reversible Beanie Pattern
How to crochet a beanie? In this tutorial, I show you how to crochet a very simple reversible beanie that will keep you warm and give you two beanies in one! This beanie should only take you about 2 hours to complete, making it a very quick and easy beanie pattern to follow. The colors used in this pattern can easily be exchanged to fit whatever color scheme you like. I do want to warn you that this beanie is on the large side, but that can easily be changed by decreasing your single crochet stitches until this beanie fits comfortably around your head!
Pom Pom (Pompon) Maker: https://youtu.be/6ISz8AcMusk
Crochet Reversible Beanie Video Tutorial:

This beanie is part of a series of beanies that I am creating to donate to my local homeless shelter. The goal is to complete 100 beanies in 100 days, all using unique patterns that I am going to share with you each day.
Stitches used in this pattern (and their corresponding tutorials):
Magic Circle (MC): https://youtu.be/pTcHUJ8PDMQ
Double Crochet (DC): https://youtu.be/bA7b2sOIfzM
Single Crochet (SC): https://youtu.be/xppth_5GBzM
Slip stitch (SL st): https://youtu.be/cMNam0kuhpQ
Reversible Crochet Beanie Pattern:
Crochet Hook: F / 5 / 3.75MM
Yarn: 4 Medium ~ Big Twist Value brand
Magic Circle
Row 1: 12 DC inside MC.
Row 2: Following continuous loop pattern (we won’t start and stop each row, but instead this pattern will act as more of a spiral), place 2 FRONT POST stitches in each st in the row (24 total st at end of row).
Row 3: *1 FRONT POST st in st 1, 2 FRONT POST st in st 2.* Repeat * around the row (36 total st at end of row).
Row 4: *1 FRONT POST st in st 1 – 2, 2 FRONT POST st in st 3.* Repeat * around the row (48 total st at end of row).
Row 5: *1 FRONT POST st in st 1 – 3, 2 FRONT POST st in st 4.* Repeat * around the row (60 total st at end of row).
Row 6: *1 FRONT POST st in st 1 – 4, 2 FRONT POST st in st 5.* Repeat * around the row (72 total st at end of row).
Row 7: *1 FRONT POST st in st 1 – 5, 2 FRONT POST st in st 6.* Repeat * around the row (84 total st at end of row).
Rows 8 – 18: 1 FRONT POST st in each st in the row.
Row 19: *1 SC in st 1 – 5, SC 2together in st 6 & 7.* Repeat * around the row (72 total st at end of row).
Row 20: *1 SC in st 1 – 4, SC 2together in st 5 & 6.* Repeat * around the row (60 total st at end of row).
Rows 21 – 30: Place 1 SC in each st in the row.
Place 1 SL st in the next 10 st.
Cut and tie off yarn.
Attach a pom pom: https://youtu.be/6ISz8AcMusk
Other beanie tutorials in my 100 day series:

![]()
![]()
![]()
![]()
![]()
![]()
![]()
![]()
![]()
![]()
![]()
![]()
![]()
![]()
![]()
![]()
![]()
Leave a Reply